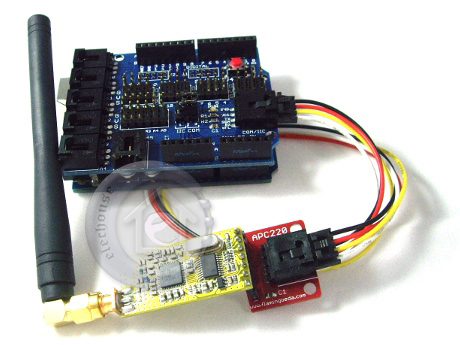
In the previous article,we have discussed how to use the RF module to control Arduino wirelessly. Its principle is similar to a remote control, which has 4 buttons for RF wireless remote control. However,on occasions of data transmission, such a solution becomes less suitable,for example when you want to send PC the data that Arduino collected from light sensors.It is technically known as the wireless data transmission. At present, there are many solutions for wireless data transmission.A very simple way is connecting with the Arduino using APC220 to send data via serical port. Although the data transmission speed may slow (limited by the serial port baud rate) ,it is a simple and pratical way.No wonder that many netizens recommended the inclusion of such Arduino module support.
Manufacturers do not give any datasheet or material to us. Fortunately, some can be found on the network.Meanwhile learn by researching. First,USB adapter from manufacturer seems not to match APC220 because the number of pins is different. Maybe because it has to be compatible with other different products, or at least it is not specially designed for the APC220. USB adapter used CP2102 chip.Download the appropriate drivers in Silicon Laboratories, I downloaded the file cp210x_vcp_win2k_xp_s2k3.zip, unzipped to get an exe file, then instal the driver step by step following the prompts.
Manufacturers do not give any datasheet or material to us. Fortunately, some can be found on the network.Meanwhile learn by researching. First,USB adapter from manufacturer seems not to match APC220 because the number of pins is different. Maybe because it has to be compatible with other different products, or at least it is not specially designed for the APC220. USB adapter used CP2102 chip.Download the appropriate drivers in Silicon Laboratories, I downloaded the file cp210x_vcp_win2k_xp_s2k3.zip, unzipped to get an exe file, then instal the driver step by step following the prompts.
After driver installation is complete,insert USB adapter into the PC's USB interface, Windows will be prompted to find new hardware,?then finsh installation and configuration accordingly:

When Windows prompts that you can use the hardware.Below the Device Manager's "Ports (COM & LPT)" is CP2102 virtual serial port:

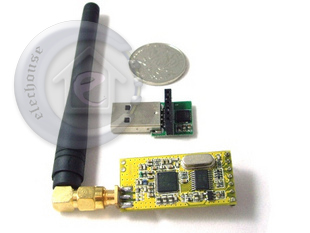
APC220 module can now be connected to a USB adapter.As pin number of USB adapter and APC220 is different, pay attention to the insert location:

Open setup program "RF-ANET" gotten from APC220 manufacture. CP2102 has found the default serial port "COM87".However, RF-ANET can not open the port.

In the Device Manager, set serial port to COM4 , re-insert the USB adapter and open RF-ANET, click the "Read R" button.Everything is all right.The status bar displays "read succeed!", which means we are able to communicate with APC220.
When Windows prompts that you can use the hardware.Below the Device Manager's "Ports (COM & LPT)" is CP2102 virtual serial port:
APC220 module can now be connected to a USB adapter.As pin number of USB adapter and APC220 is different, pay attention to the insert location:
Open setup program "RF-ANET" gotten from APC220 manufacture. CP2102 has found the default serial port "COM87".However, RF-ANET can not open the port.
In the Device Manager, set serial port to COM4 , re-insert the USB adapter and open RF-ANET, click the "Read R" button.Everything is all right.The status bar displays "read succeed!", which means we are able to communicate with APC220.

Then we finished setup work on PC side. Now come to Arduino side. APC220 module has 4 connection wires to Arduino: 5V, GND, TX and RX.Note that APC220 and Arduino are a separate serial device, so connect TX on the Arduino to RX on APC220 and conncet RX on Arduino to TX on APC220:

APC220 module's default baud rate is 9600. Let's test it with the following code.Note that when downloading process to Aduino, break the connection of TX and RX on APC220, otherwise downloading will be wrong.
int val = 0;
int ledPin = 13;
void setup()
{
Serial.begin(9600);
}
void loop()
{
val = Serial.read();
if (-1 != val) {
if ('A' == val 'a' == val) {
Serial.println("Hello from Arduino!");
}else if ('B' == val 'b' == val) {
digitalWrite(ledPin, HIGH);
delay(500);
digitalWrite(ledPin, LOW);
}
}
}
int ledPin = 13;
void setup()
{
Serial.begin(9600);
}
void loop()
{
val = Serial.read();
if (-1 != val) {
if ('A' == val 'a' == val) {
Serial.println("Hello from Arduino!");
}else if ('B' == val 'b' == val) {
digitalWrite(ledPin, HIGH);
delay(500);
digitalWrite(ledPin, LOW);
}
}
}
In summary, now that we have respectively connected Arduino and PC to APC220 module, and also has written test code to Arduino. While everything is ready, we can start the tests. First,we have to use an external power supply to power Arduino, because if the USB cable is connected, FT232 module will be activated,and then FT232 serial port and ACP220 serial port will conflict, leading to communication failure:

Put powed-on Arduino into a corner of the room. Then configure the PC. Through its USB adapter, APC220 module works like a serial port.So we can use Arduino's development environment to test.In this case your PC is no longer connected to Arduino, but to APC220 USB adapter. After USB adapter's connection, open Arduino, in the "Tools" ; "Serial Ports" menu, select "COM4" (in line with the previous settings). Then open "Serial Monitor" in Arduino, send the A character. PC will receive "Hello from Arduino!" from Arduino. Send the B characters, then No. 13 LED on the Arduino is lighted(continuous 0.5 seconds):


No comments:
Post a Comment